
15 Cool Wood Carving Ideas for Any Skill Level
Wood carving is classic artistry that combines imagination, patience, and skills just to transform wood blocks into striking works of art. From detailed wood sculpture ideas to functional home decor, wood carving lets you express your imagination in creating something unique. Here's a compilation of the cool wood carving ideas that will spark creativity for your next project.
Essential Tools for Simple Wood Carving Ideas
Carving ideas wood requires the right tools and materials to ensure precision and safety.
|
Tool |
Purpose |
Skill Level |
|
Whittling knife |
For general carving and shaping |
Beginner |
|
Gouges |
For creating curves and hollows |
Beginner to expert |
|
Chisels |
For straight cuts and fine details |
Intermediate |
|
Mallet |
For applying a controlled force |
Intermediate to expert |
|
Sandpaper |
For smoothing the surface |
All skill levels |
|
Rotary tool |
For detailed and intricate designs |
Expert |
Choosing the Right Wood
Different types of wood offer varying properties that can impact your useful wood carving ideas. Here's a quick guide:
|
Wood Type |
Features |
Best For |
|
Basswood |
Soft, easy to carve |
Beginners, detailed carvings |
|
Butternut |
Lightweight, grainy texture |
Intermediate woodcraft projects. |
|
Oak |
Hard, durable |
Sculptures, furniture |
|
Cherry |
Smooth, fine-grain |
Decorative items |
Top 15 Wood Carving Ideas for All Skill Levels
Easy Wood Carving Ideas for Beginners
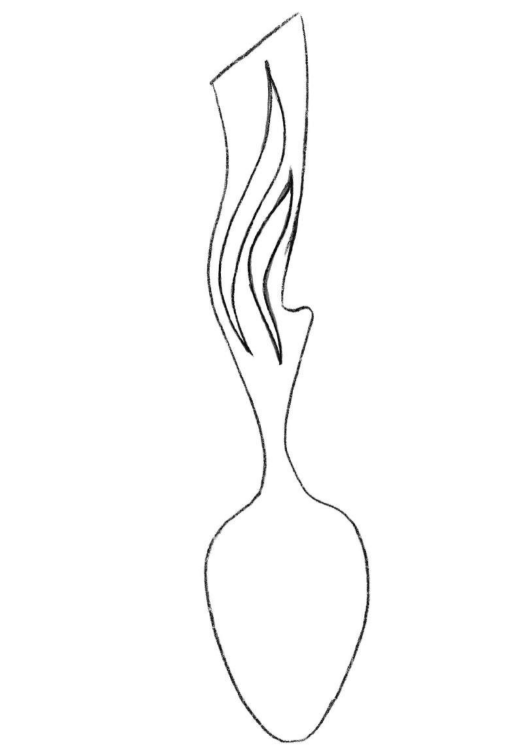
1. Wooden Spoons
Craft your own beautiful and functional woodcarving ideas by following these steps:
-
Outline the spoon. Begin by sketching the spoon's profile onto a flat piece of wood. Mark the bowl and handle clearly, ensuring the proportions are practical and balanced.
-
Initial shaping. Use a saw or carving knife to cut out the rough shape of the spoon. Remove excess wood around the outer edges, focusing on defining the handle and bowl.
-
Refining the form:
-
Carve the bowl, scooping out the center to achieve the desired depth.
-
Shape the handle, smoothing its curves and ensuring it feels comfortable in the hand.
-
Add details:
-
Refine the edges of the bowl and handle using smaller carving tools.
-
Smooth out transitions between the bowl and handle for a polished appearance.
-
Final touches. Sand the entire spoon thoroughly to eliminate rough edges and splinters. Apply a food-safe finish, such as mineral oil or beeswax.
Tools needed: Carving knife, gouge, sandpaper, and food-safe wood finish.
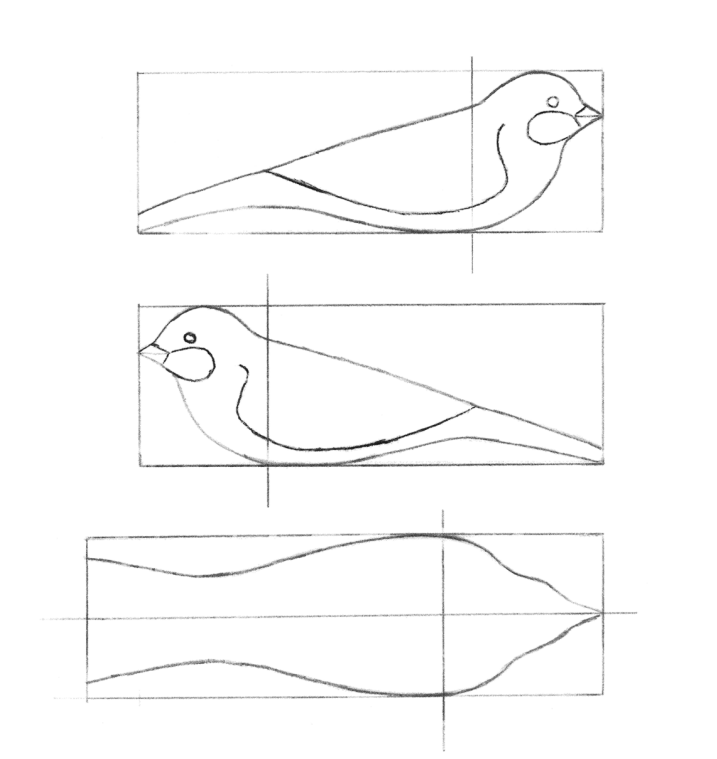
2. Bird Carving
Create detailed and graceful bird wood carving design ideas by following these steps:
-
Outline the bird. Start by sketching the bird's profile onto a rectangular wooden block. Use the provided image for accuracy in proportions, ensuring the head, body, and tail are balanced.
-
Initial shaping. Use a carving knife while cutting out the rough shape of the little bird. Remove excess wood around the outer profile, focusing on defining the general silhouette.
-
Refining the form:
-
Carve the body, gradually shaping the bird's back and belly curves.
-
Define the head, beak, and tail with careful, shallow cuts.
-
Add details:
-
Outline the wing and eye features using smaller tools for precision.
-
Smooth transitions between the body parts to achieve a natural appearance.
-
Final touches. Sand the entire piece to remove rough edges and ensure a smooth surface. Apply a wood stain or a clear finish.
Tools needed: Carving knife, small chisels, sandpaper, and optional wood finish.
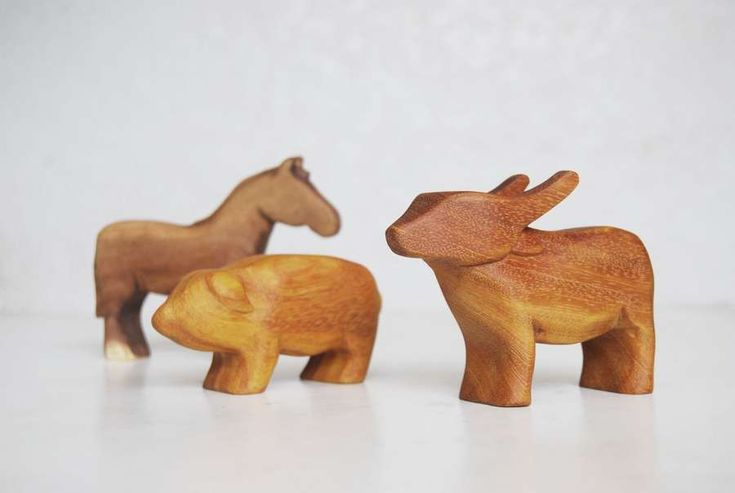
3. Lion
Carve a small lion figurine to improve your wood carving skills and create unforgettable wood carving patterns.
-
Prepare the design. Draw an outline of the lion's face on the block. Use the picture to create the mane, ears, and other details of the face as realistically as possible. Remember symmetry, especially for the eyes and nose.
-
Rough out the shape. Using a sharp carving knife, remove the excess wood to create the basic shape of the lion's head. The basic outline should include the general shape of the mane and a proportionate face to the design.
-
Add details. Once the rough shape is prepared, switch to smaller chisels and carve finer details:
-
Eyes. Gently chisel the sockets of the eyes, shaping them to reflect the piercing gaze of the lion.
-
Nose and mouth. The nose should be carved triangular and should have lines leading down toward the mouth. Add slight curves for the lion's characteristic expression.
-
Mane. Use texture to make the mane by making short, wavy strokes to simulate fur. Vary the length and direction to give it that realistic effect.
-
Refine and smooth. Use sandpaper to smooth the edges and clean up any rough areas. For a really polished look, pay extra attention to feathering the transitions between the mane and the face.
-
Finishing touches: If needed, add more depth by shading areas with a woodburning tool or adding a natural wood stain to bring out the lion's features.
Tools needed: Carving knife, small chisels, fine grit sandpaper, and optional: woodburning tool or wood stain.

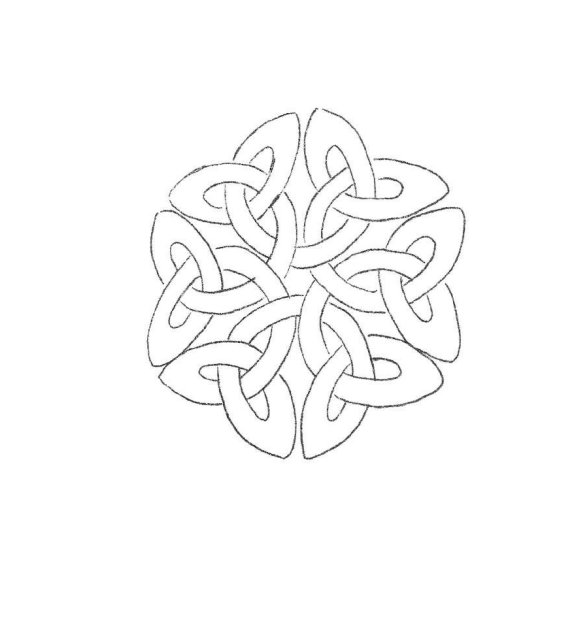
4. Lettering and Signs
Use elegant wood carvings ideas to challenge your precision and create a visually stunning piece.
-
Prepare the design. Sketch the rosette pattern onto a flat wooden block. Use the image as a reference to ensure symmetry and interwoven details. A compass or stencil may help you maintain even proportions.
-
Rough out the shape. Use a carving knife to remove the outer wood around the circular shape of the rosette. Focus on achieving a clean and uniform outline before moving to the inner details.
-
Define the interwoven pattern:
-
With smaller chisels, carve along the lines of the rosette’s overlapping loops.
-
Start by making shallow cuts to outline the pattern. Ensure that each loop appears to weave under and over its neighbors.
-
Gradually deepen the cuts for better definition, being careful not to remove too much material.
-
Add Depth and texture:
-
Carve the recessed areas slightly deeper to enhance the three-dimensional appearance of the design.
-
Use finer chisels or gouges to smooth the curved sections of each loop.
-
Consider adding subtle texture to the recessed spaces for a more intricate look.
-
Refine the edges. Sand the edges of the loops and outer border with fine-grit sandpaper to achieve a polished finish. Pay special attention to transitions between the interwoven sections.
-
Finishing touches:
-
To darken recessed areas, you can stain the wood or use a woodburning tool. This will add contrast and enhance the design.
-
Apply a clear coat or varnish to protect the rosette and give it a nice, polished look.
Tools needed: Carving knife, small chisels (flat and rounded), gouges, sandpaper (fine grit), woodburning tool (optional), and wood stain or varnish (optional).
Intermediate Wood Carving Projects
5. Decorative Coasters
Decorative coasters with intricate patterns are great carving wood ideas for intermediate carvers. They’re practical, stylish, and an excellent way to improve carving precision.
-
Prepare the wood. Choose durable wood like maple or walnut and cut it into small squares (around 4x4 inches). Sand the edges and surface for a smooth finish.
-
Sketch your pattern. Lightly draw your design with a pencil. Popular patterns include geometric shapes, floral motifs, or themed illustrations. Use stencils if needed for accuracy.
-
Carve the design. Follow your sketch with a gouge and chisel, starting with larger tools for outlines and smaller ones for fine details. Work carefully to maintain precision and avoid splintering.
-
Finish the coasters. Smooth the surface with fine sandpaper, then apply varnish or finishing oil to protect the wood and enhance the details. Allow it to dry completely.
Tools needed: Chisel, gouge, pencil, varnish.

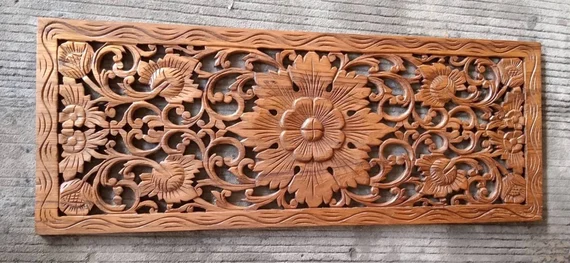
6. Wall Hanging Panels
Wall hanging panels with decorative relief carvings make stunning, personalized home decor pieces. This project may need handmade woodcarving tools as they can help you be more creative, whether you choose natural motifs, abstract patterns, or intricate designs.
-
Prepare the panel. Select a flat wood panel, such as oak or cherry, and sand it smooth.
-
Sketch your design. Using a pencil, lightly draw a design (e.g., a tree, mandala, or geometric pattern). Use stencils if needed.
-
Carve the background. Use a gouge to remove the background, leaving the main design raised. Ensure consistent depth.
-
Add details. Refine the raised design with chisels, adding texture and intricate features.
-
Sand and finish. Smooth the surface with fine sandpaper and apply a varnish or stain to protect and enhance the wood.
Tools needed: Gouge, chisel, sandpaper, varnish.
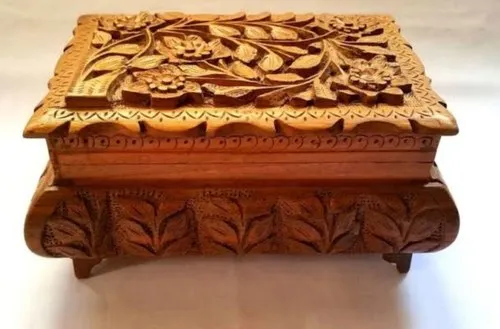
7. Jewelry Boxes
Small wooden jewelry boxes with intricate carvings make a thoughtful and personalized gift. They can store jewelry and display your carving skills and creativity.
-
Assemble the box. Start with pre-cut wood pieces for the base, sides, and lid. Use wood glue or nails to assemble them, ensuring all edges are aligned.
-
Carve decorative designs. With a chisel, carve designs into the lid and sides. This is often done with flowers or geometrical shapes on intricate or even elegantly done swirls of wood.
-
Sand the surfaces. Smooth all surfaces with sandpaper to remove rough edges and give the box a polished appearance.
-
Apply wood finish. Apply wood finish or varnish to enhance the beauty of the wood when the carving and sanding steps are complete for protection.
-
Attach hinges and hardware. Attach hinges to the lid and other hardware (such as clasps) to complete the box. Ensure the hinges work smoothly and the box opens and closes properly.
Tools needed: Chisel, sandpaper, drill, wood finish.
8. Picture Frames
Creating custom picture frames with carved embellishments is an excellent project for showcasing your carving skills. These frames add a personal touch to photos or artwork, making them ideal for gifts or home decor.
-
Cut the wood. Start by cutting the wood to the desired frame dimensions, typically for 4x6 or 8x10-inch photos. Be sure the edges are straight and even.
-
Carve patterns. Use a gouge to carve decorative patterns or textures along the edges of the frame. Depending on your preference, you can create floral, geometric, or abstract designs.
-
Sand the frame. Smooth the carved areas and the rest of the frame using sandpaper, ensuring no rough spots.
-
Apply finish. Apply varnish or paint to the frame to protect the wood and enhance its appearance. Choose a clear varnish for a natural look or a painted finish for a bold design.
-
Assemble the frame. Once the finish is dry, assemble the frame by adding glass, a backing, and the photo or artwork of your choice.
Tools needed: Gouge, sandpaper, varnish.

Advanced Carving Ideas for Experts
9. Intricate Wood Sculptures
Detailed wood sculpture, like animal busts, is complex and rewarding for experienced carvers. This will allow you to see your artistic vision take shape before your eyes as you transform a simple block of wood into an amazing work of art.
-
Select the wood. Choose a block of hardwood, such as oak, cherry, or basswood. These woods are ideal for carving because of their fine grain and durability.
-
Rough out the shape. Using a chisel and mallet, begin by removing large sections of wood to form the basic shape of the sculpture. Work slowly, focusing on the general proportions.
-
Refine the details. When the rough shape is achieved, switch to finer chisels and rotary tools to add intricate details, such as the face or textures. Go slow and define the eyes, nose, and mouth, or whatever complex elements your sculpture may have.
-
Sand the surface. Use fine-grit sandpaper to remove any tool marks. Sand carefully around the details to avoid damaging the fine work.
-
Apply finish. Apply a finishing oil or wax to preserve the sculpture.
Tools needed: Chisel, rotary tool, mallet, finishing oil.
10. Custom Wooden Bowls
Wooden bowls are classic DIY wood carving ideas, both functional and decorative.
-
Select your wood. Begin by choosing a hardwood like cherry or walnut for a sturdy, visually appealing bowl.
-
Rough out the shape. Use a gouge to hollow out the center of your bowl, working carefully to create an even, deep cavity.
-
Shape the exterior. Once the interior is hollowed, switch to your chisels to shape the outer edges and sides of the bowl. Depending on your design preferences, you can opt for a traditional, smooth curve or experiment with more angular lines.
-
Smooth and refine. Sand the bowl thoroughly, starting with a coarse grit sandpaper to remove rough patches. This will highlight the natural beauty of the wood.
Tools needed: Gouge, chisel, sandpaper, oil.

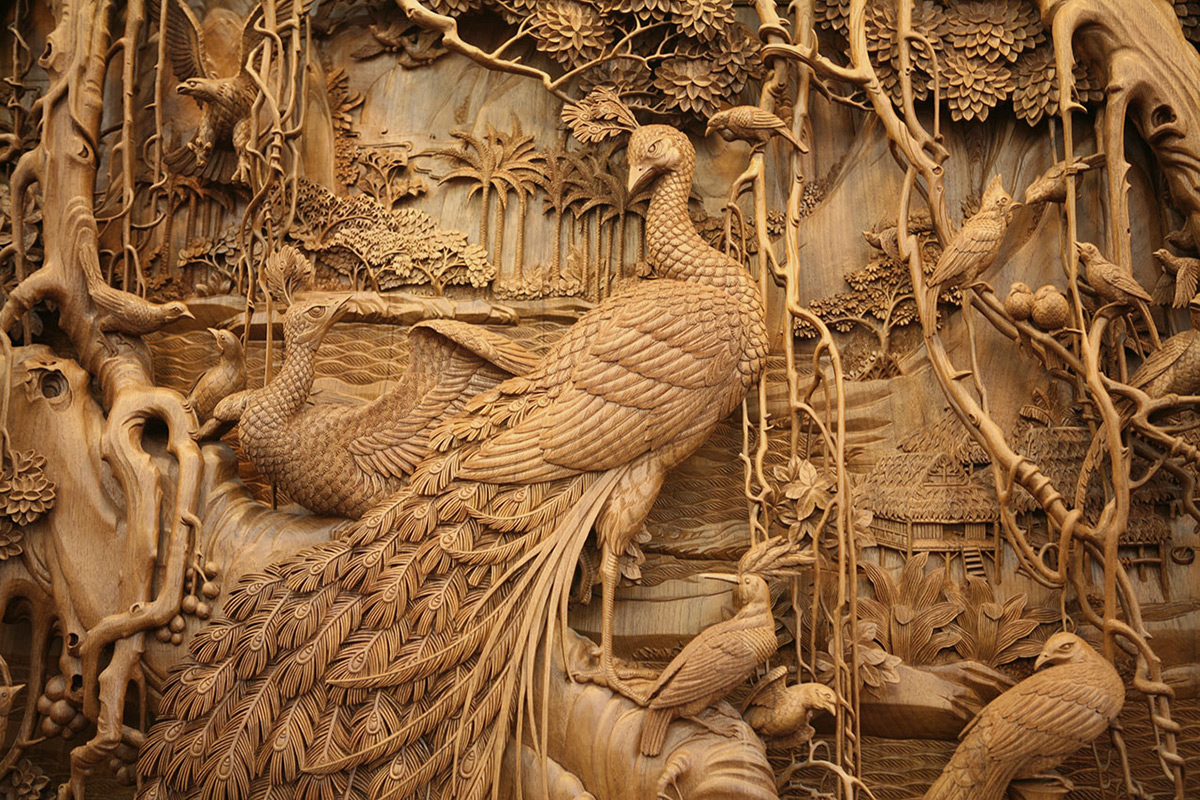
11. Relief Carving Panels
Relief carving presents the exciting opportunity to turn a flat piece of wood into a three-dimensional art piece. By skillfully carving through different layers of depth, you can create visually dynamic designs that jump off the surface.
-
Sketch the design. Start by sketching your design onto a flat wood panel. You can freehand your design or use stencils for more complex patterns. Ensure the design includes varying levels of depth to give the piece a relief effect.
-
Carve the base layer. Begin carving with larger chisels to create the deepest areas of your design. This will be the background of the relief carving. Use a gouge or flat chisel to remove large sections of wood, establishing the overall depth of the design.
-
Shape mid-levels. Once the base layer is carved, use medium-sized chisels to refine the next layer of depth. These parts should be raised slightly from the background but appear recessed compared to the highest layers. Gradually build up these areas, ensuring a smooth transition between the layers.
-
Add fine details. Switch to smaller chisels and carving tools for the final, intricate details. This step will bring the design to life with delicate textures, lines, or patterns that emphasize the layered effect of the relief. Pay close attention to the finer nuances, such as veins in leaves, facial features, or small flourishes.
-
Smooth and refine the surface. After carving, sand the surface with sandpaper, using a coarser grit to remove the rough edges and then gradually working your way to a finer one.
Tools needed: Chisels, sandpaper, varnish.

Advanced Carving Ideas for Experts
12. Wooden Clocks
Creating a decorative wooden clock is a great woodworking idea to add a personal touch to your home. Here’s a simplified guide:
-
Cut a wooden base. Choose a piece of wood and cut it into a round or square shape.
-
Carve decorative edges. Use carving tools to add patterns around the clock's edges, giving it a unique look.
-
Drill a hole for the mechanism. Mark the center and drill a hole for the clock mechanism to fit.
-
Assemble and finish. Insert the clock mechanism, attach the hands, then sand and finish the wood surface with varnish or stain.
Tools тeeded: Drill, chisel, gouge, clock mechanism.

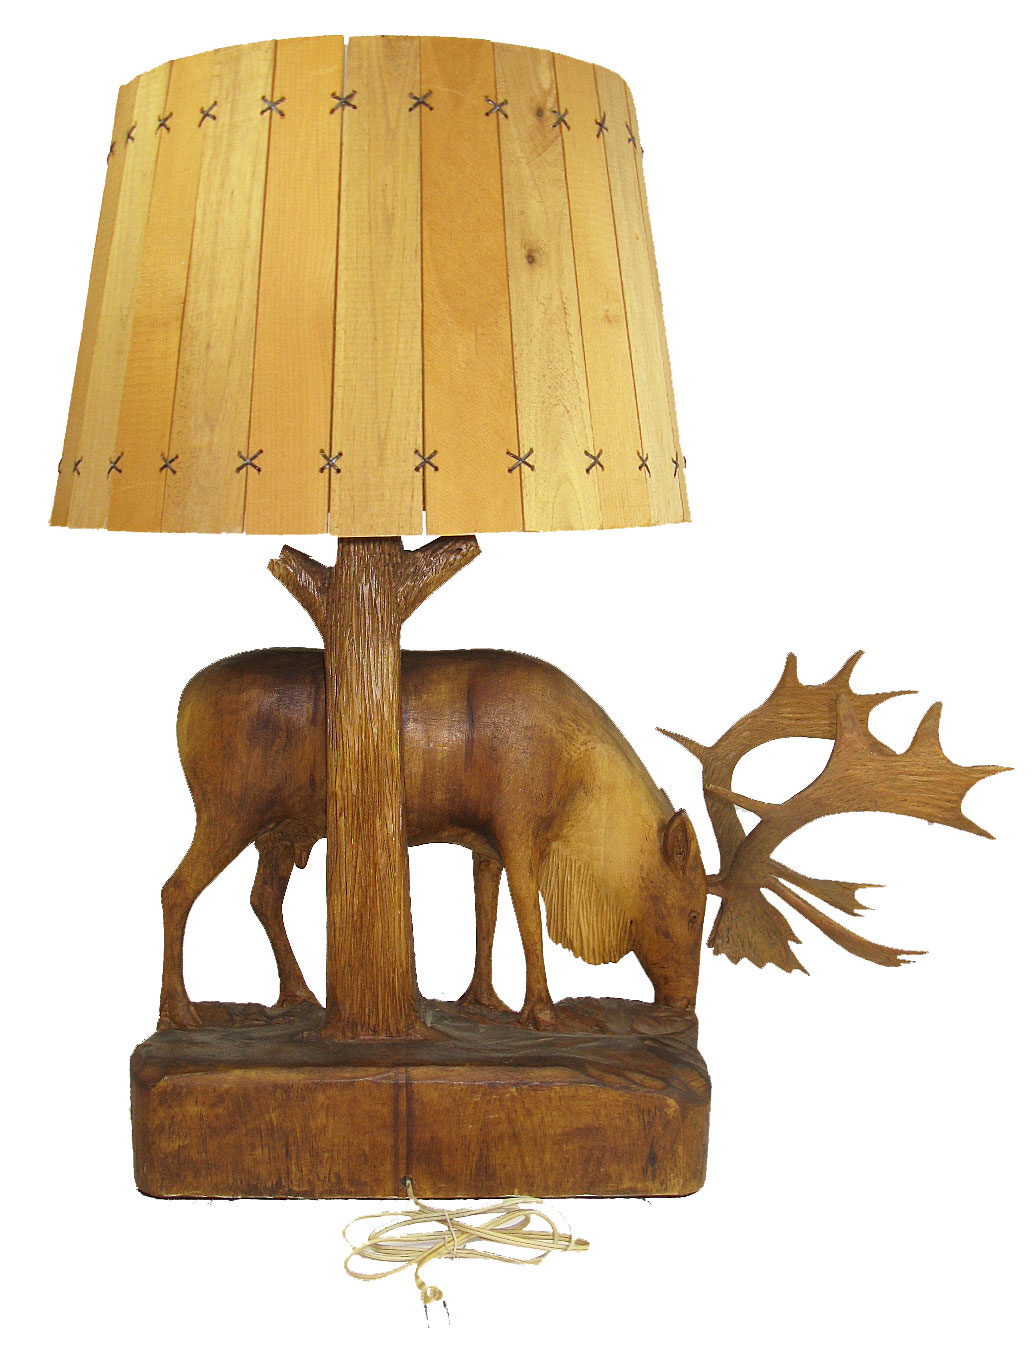
13. Wooden Lamps
Design artistic lamp bases with wood carvings.
-
Choose a hardwood block for the base.
-
Carve unique patterns or shapes into the wood.
-
Drill a hole for the lamp rod.
-
Assemble the lamp and apply a finish.
Tools needed: Chisel, drill, sandpaper, lamp kit.
14. Animal Busts
Carve detailed animal busts like a deer or lion head.
-
Start with a hardwood block.
-
Rough out the shape using a chisel and mallet.
-
Add fine details with rotary tools and small chisels.
-
Sand and finish with varnish or oil.
Tools needed: Chisel, rotary tool, sandpaper, varnish.
15. Wooden Chess Sets
Craft a complete chess set with intricate piece designs.
-
Choose a hardwood like walnut or maple.
-
Carve each chess piece with unique details.
-
Sand and polish each piece.
-
Carve or assemble the chessboard.
Tools needed: Chisel, gouge, sandpaper, polish.

Tips and Tricks for Cool Wood Carving Projects
-
Start with a сlear plan. Sketch your ideas for wood carving beforehand to avoid mistakes.
-
Keep tools sharp. Dull tools can ruin your project and increase the risk of accidents.
-
Choose the right wood. Match the wood type to the project complexity and your skill level.
-
Practice patience. Rushing can lead to errors and uneven carvings.
-
Learn from others. Join woodcarving communities or watch tutorials for inspiration.
Conclusion
Exploring simple wood carving ideas involves satisfying creativity and craftsmanship. From creative wood carving ideas for beginners to intricate projects for seasoned carvers, there's something for everyone. Remember, invest in quality tools and practice consistently, embracing the process all the while. Happy carving!